Author Archives: admin

How to scan devices behind a NAT firewall with TADDM

I have a couple of test VMs on my home network. These boxes are behind my NAT router which has port forwarding options these are both Linux and Windows servers. Since we did several integrations lately, we needed our test taddm server to scan these VMs. The taddm server has full internet access so it can connect to any device that is accessible on the internet. The following steps we performed to scan these devices:

– Dedicate a linux based box as anchor in the internal network.
– Change the ssh port to a custom high port ( we used 9901 ) that will be allowed though by my internet provider.
– Forward the selected port ( we used 9901 ) and the default anchor port 8497 to the dedicated linux box on the NAT router.
– Dedicate a Windows based box to be the windows gateway in the internal network, this is required as we have windows servers that we would like to scan.
– Follow this procedure  to install Cygwin SSH server on that windows box. Leave the SSH port on default ( 22 )
– Create a scope for the internal ip range we named the scope Scope_internal_ip and added range 192.168.1.0-192.168.1.255 since this is the range we are using internally on our local network.
– Create a scope for the anchor box which only has its the ip of the router defined. We named this scope to Scope_Anchor.
– Taddm has the option to change the default SSH port for any scope you specify. To achieve this we add new lines the collation.properties file ( usually location under ./taddm/dist/etc ). Add the name of the scope after com.collation.SshPort option like com.collation.SshPort.Scope_internal_ip. You can define a different SSH port for each scope you have. Also please make sure that you keep the original setting for port 22. The port 9901 has to be added to the com.collation.pingagent.ports setting as well as taddm only pings for ports listed in this value. This is not set in collation.properties by default will have to be added once a non-standard port is in play.
Add/change the following in collation properties:

#=========================
# SSH Settings
#=========================
# Default port to use for all ssh connections
com.collation.SshPort=22
# This sets SSH to port 9901 for scope internal_ip
com.collation.SshPort.Scope_internal_ip=9901
#This sets ping agent to use port 9901 as well for checking availability or the target.
com.collation.pingagent.ports=22,135,9901

– Create an anchor using the Discovery Management Console. We use the ip address of our router here and select to use internal_ip scope.
– Create a windows gateway using the Discovery Management Console. Use the internal ip address of the windows server. In our case this was 192.168.1.7
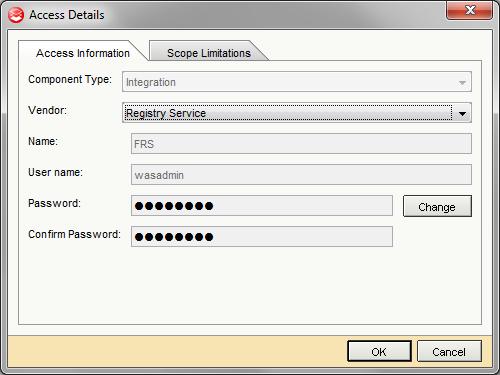
– Create access lists for each id involved, we used the following ids: root for the linux anchor, Administrator for the windows gateway, and taddm for the rest of the windows boxes on the internal network. So user Administrator and taddm has Scope_internal_ip as the scope limitation and root has Scope_Anchor as the scope limitation.

Now the environment is all set up, initiate a New Discover from the Discovery Management Console, select the 2 newly created scopes run the scan. This should install the anchor on your dedicated linux box, identify and install the windows gateway, scan the internal network and scan all boxes having taddm id active.

TADDM and JAZZ SM integration using OSLC

This guide will show you how to integrate TADDM and JAZZ SM. There is very little information on how this works, I collected this information from various versions of TADDM documentation and from videos posted online by IBM. The following steps will be performed in order to get this configured:

1: Edit TADDM’s collation.properties configuration file to enable the OSLC provider.

To perform this open the collation.properties file on the TADDM server with an editor of your choice. There are 3 versions of collation.properties file on the system so make sure that you open the one in ./dist/etc.  Edit the following properties:

# This is the parameter to set up your Jazz server location. make sure that you use the fully qualified hostname, then check if you can ping that URL from your taddm server.
com.ibm.cdb.topobuilder.integration.oslc.frsurl=[hostname_of_your_jazz_server]:[jazz_server_port]
# This is the parameter to set up your TADDM server URL
com.ibm.cdb.topobuilder.integration.oslc.taddmURL=[your_taddm_hostname]:9430
com.ibm.cdb.topobuilder.integration.oslc.frsretrycnt=3
com.ibm.cdb.topobuilder.integration.oslc.frshttptimeout=5000
com.ibm.cdb.topobuilder.integration.oslc.frsfailfastafter=5
com.ibm.cdb.topobuilder.integration.oslc.enable.configurationsp=true
com.ibm.cdb.topobuilder.integration.oslc.enable.changehistorysp=true

2: Add Jazz connection parameters to TADDM using the TADDM Gui

Open the Discovery Management Console, navigate to Access list option, and create the following access list.

taddm-registry

This defines the login credentials for your Jazz server. The OSLCAgent will use this to connect to the Jazz server and register the TADDM provider.

3: Restart TADDM’s OSLC Agent and see the logs if the connection is successful

The taddm’s oslc agent can be managed by its command line utility. To make the agent re-register you have to issue the following command:

./runtopobuild.sh -a OSLCAgent

The location of the runtopobuild.sh utility is in ./dist/support/bin/ directory. Once you run the command have a look at the OSLC Agent’s log file which is located in ./dist/log/agent/ directory. If you defined the parameters right you should see something similar:

2014-04-28 14:32:55,678 TopologyBuilder [pool-1-thread-1]  INFO cdb.TivoliStdMsgLogger – CTJOT0402I Topology builder agent com.ibm.cdb.topomgr.topobuilder.agents.core_1.0.0:com.collation.topomgr.topobuilder.agents.integration.oslc.OSLCAgent is starting.
2014-04-28 14:32:55,714 TopologyBuilder [pool-1-thread-1]  INFO util.GuidAliasing – Found 0 duplicates for guid : 71C7D480CF2D3022B43AD190A9F25681
2014-04-28 14:32:57,965 TopologyBuilder [pool-1-thread-1]  INFO elements.Element – [OSLCAgent.I.0] Cleansing rules loaded from file: /app/IBM/taddm/dist/etc/oslc/cleansingRules.xml
2014-04-28 14:33:00,295 TopologyBuilder [pool-7-thread-2]  INFO tasks.FrsTask – [OSLCAgent.I.1] POST OK for guid: 7F54D544F4883923B10BE6E492EA6BAD, for type: CRTV:CRTV:SoftwareModule, HTTP status: 201, FRS response: HTTP/1.1 201 Created, processing time: (M/S)QL: 26ms, 0s JOB: N/A <RDF: 5ms, 0s FRS: 566ms, 0s JDO: 22ms, 0s>, provider: configuration

The POST OK message in the log shows that the connection has been established to the Jazz server correctly and data is being posted across.

4: Check if the provider is showing up on TADDM

If the provider is successfully registered on Jazz it should show up on your Jazz Server. This can be located on the following URL:

http://your_jazz_server:16310/oslc/pr/collection

collection

There should be 2 providers registered:

http://your_taddm_server:9430/cdm/oslc/changehistory

changehistory

http://your_taddm_server:9430/cdm/oslc/configuration

configuration

Please note this guide is for Linux/UNIX only. We haven’t tested this in a Windows environment and we are not intending to.

Adding a MySQL Data Source to TEPS using JDBC

We had a requirement to display data from a remote MySQL database on TEPS. There is absolutely no documentation on how to do this so I attempt to explain how we managed to sort this out.

1: Check if you can get to the MySQL database from the TEPS server. You can run the following PHP script if it is not giving an error the connection is working fine! Replace
the highlighted variables with your own details.

<?php

// opening DB connection

$dbhost = ‘database_hostname‘;
$dbuser = ‘database_username‘;
$dbpass = ‘database_password‘;

$conn = mysql_connect($dbhost, $dbuser, $dbpass) or die (‘Error connecting to mysql’);

$dbname = ‘database_name‘;
mysql_select_db($dbname);

?>

2: Add the MySQL data source to the TEPS datasource list. We used the following command:

/opt/IBM/ITM/bin/tacmd configurePortalServer -s DSUSER2 -p UID=database_user PWD=database_password CONNECTION_TYPE=JDBC KFWJDBCDRIVER=com.mysql.jdbc.Driver KFWDSURL=jdbc:mysql://database_hostname:3306/database_name

This will create the DSUSER2 datasource.

3: Download MySQL JDBC connection driver from http://dev.mysql.com/downloads/connector/j/

4: Add MySQL JDBC connection driver to cq.ini this will ensure that the driver is loaded.

KFW_JVM__CTJDBC__CLASSPATH=$CANDLEHOME$/$BINARCH$/$PRODUCTCODE$/lib/tepjdbc.jar:/app/mysql-connector-java-5.1.24-bin.jar:$KFW_EWAS_HOME$/derby/lib/derby.jar:$KFW_JDBC_DRIVER$

5: Restart TEPS

Once teps is restarted the new data source should show up when you try to create a custom query on TEPS. Simply enter the SQL you would like to run against the MySQL database and the data should show up on teps in table format.

Moving Tivoli Common Reporting Content Store Database

We had to move the Tivoli Common Reporting Content store database. Both database DB2 servers are the same OS and same DB2 version otherwise this method is not working!

To move the database from the old server to the new one we did the following steps:

  • Backup old database ( backup database cognos )
  • Copy backup file to new server ( scp … )
  • Restore database on new server ( restore database cognos to /app/db2db )
  • create tcradmin user on new server and assign required db2 rights.

I spent about an hour googling where these database settings are stored with no success so finally I decided to find the configuration file myself. The database connection parameters are stored in cogstartup.xml file in the cognos configuration directory. We have changed the following parameter:

<crn:parameter name=”server”>
<crn:value xsi:type=”cfg:hostPort”>x.x.x.54:50001</crn:value>
</crn:parameter>

to

<crn:parameter name=”server”>
<crn:value xsi:type=”cfg:hostPort”>x.x.x.53:50001</crn:value>
</crn:parameter>

After restarting Jazz the cognos is now connected to the new database server.

Enable TCP/IP communcations on DB2

Our db2 instance user is smadmin

Edit /etc/services file to have the desired port set. I used 50000 and service name db2c_smadmin

db2c_smadmin    50000/tcp

Su over to the db2 user and run the following:

db2set DB2COMM=tcpip
db2 update database manager configuration using svcename db2c_smadmin

Restart the DB2 instance:

db2stop force
db2start

Check if the desired port is open:

telnet localhost 50000
Trying 127.0.0.1…
Connected to localhost.
Escape character is ‘^]’.

If the operation was successful the connection is successful as it is in the example above.

Configuring TEPS on SUSE Linux 64 – Fixes

I found 2 problems during TEPS configuration.

1: Had to uncomment the ip v6 localhost entry

#::1 localhost ipv6-localhost ipv6-loopback

If you have the same problem you will see the following errors in the kfwjras1.log:

*** (RAS1 Tracing has been modified: New Filter: ERROR
*** (0) Trace options are:
*** () Trace mode: LOCAL (threaded output) to /app/IBM/ITM/logs/kfwjras1.log
*** (0) Trace parameters: ERROR
(51544790.29e6edc0-(null)main:CTJVMController,0,”CTJVMController.com.ibm.TEPS.CTJVMDeployment.CTJVMController.cinit<>”) The build level is:CJ062302.d2278a
(515447b1.37baf7c0-(null)main:QueryModelManager,0,”QueryModelManager._init()”) pullsize is set to:100
(515447b1.38538e40-(null)main:CTEventManagerBrokerImpl,0,”CTEventManagerBrokerImpl.CTQueryBrokerImpl()”) Exception: failed to resolve CTEvent::Manager
(515447b1.38538e40-(null)main:CTEventManagerBrokerImpl,0,”CTEventManagerBrokerImpl.CTQueryBrokerImpl()”) IDL:candle.com/CTIOR/NotFound:1.0
(515447b1.3862d080-(null)main:CTEventManagerBrokerImpl,0,”CTEventManagerBrokerImpl.CTQueryBrokerImpl()”) exception candle.fw.corba.CTIOR.NotFound {}
at candle.fw.corba.CTIOR.NotFoundHelper.read(NotFoundHelper.java:28)
at candle.fw.corba.CTIOR._ManagerStub.resolveObjectName(_ManagerStub.java:175)
at com.ibm.TEPS.CTIOR.CTIORBrokerImpl.resolveObjectName(CTIORBrokerImpl.java:108)
at com.ibm.TEPS.CTIOR.CTIORResolverImpl.resolve(CTIORResolverImpl.java:71)
at com.ibm.TEPS.CTEvent.CTEventManagerBrokerImpl.<init>(CTEventManagerBrokerImpl.java:64)
at com.ibm.TEPS.CTJVMDeployment.CTJVMDeploymentManager.getCTEventManagerBroker(CTJVMDeploymentManager.java:224)
at com.ibm.TEPS.CTEvent.EventModelManager.<init>(EventModelManager.java:200)
at com.ibm.TEPS.CTEvent.EventModelManager.make(EventModelManager.java:190)
at com.ibm.TEPS.CTJVMDeployment.CTJVMDeploymentManager.<init>(CTJVMDeploymentManager.java:128)
at com.ibm.TEPS.CTJVMDeployment.CTJVMJ2SEServerActivator.startServer(CTJVMJ2SEServerActivator.java:61)
at com.ibm.TEPS.CTJVMDeployment.CTJVMController.main(CTJVMController.java:88)

(515447b1.387212c0-(null)main:CTJVMDeploymentManager,0,”CTJVMDeploymentManager.com.ibm.TEPS.CTJVMDeployment.CTJVMDeploymentManager.CTJVMDeploymentManager(CTJVMOrb,CTJVMServerActivator)”) Using trac
ing filter:ERROR
*** (RAS1 Tracing has been modified: New Filter: ERROR
(515447b1.38ec24c0-(null)CTJVMDeploymentManager:CTJVMDeploymentJ2SEAdapter,0,”CTJVMDeploymentJ2SEAdapter.com.ibm.TEPS.CTJVMDeployment.CTJVMDeploymentJ2SEAdapter.makeDeployable()”) makeDeployable wi
th moduleID:KFW_JVM__CTJDBC classpath:/app/IBM/ITM/lx8263/cq/lib/tepjdbc.jar:/app/IBM/ITM/li6263/iw/derby/lib/derby.jar: className:com.ibm.TEPS.CTSQLJDBC.CTSQLJDBCModule
(515447b1.3a4b1880-(null)CTJVMDeploymentManager:CTJVMDeploymentJ2SEAdapter,0,”CTJVMDeploymentJ2SEAdapter.com.ibm.TEPS.CTJVMDeployment.CTJVMDeploymentJ2SEAdapter.makeDeployable()”) makeDeployable wi
th moduleID:KFW_JVM__CTCEV classpath:/app/IBM/ITM/lx8263/cq/lib/tepcev.jar:/app/IBM/ITM/lx8263/cq/lib/jcf.jar:/app/IBM/ITM/lx8263/cq/lib/jconn3.jar:/app/IBM/ITM/lx8263/cq/lib/jrim.jar:/app/IBM/ITM/
lx8263/cq/lib/jsafe.zip:/app/IBM/ITM/lx8263/cq/lib/niduc.jar:/app/IBM/ITM/lx8263/cq/lib/tec_ui_svr_stubs.jar:/app/IBM/ITM/classes/deploy.jar className:com.ibm.TEPS.CTCEV.CTCEVModule
(515447b2.005b8d80-(null)CTJVMDeploymentManager:CTJVMDeploymentJ2SEAdapter,0,”CTJVMDeploymentJ2SEAdapter.com.ibm.TEPS.CTJVMDeployment.CTJVMDeploymentJ2SEAdapter.makeDeployable()”) makeDeployable wi
th moduleID:KFW_JVM__CTMCS classpath:/app/IBM/ITM/lx8263/cq/lib/tepmcsattribute.jar className:com.ibm.TEPS.CTMCSAttributeService.CTMCSAttributeModule

2: When the itmuser is created configuration using the itmcmd manage gui the password for itmuser is set incorrectly. I had to manually reset the users password to be able to connect to the TEPS database.

passwd itmuser

Configuring Netcool Omnibus 7.4 on SLES 11

Please note that this is NOT a detailed installation information just made notes to myself not to forget how I got this sorted 🙂

1: Install the product from the provided media

2: Create the object server by running the following command

sudo ./nco_dbinit

This will create the default object sever NCOMS.

3: Edit the omni.dat file

The omni.dat file has to be edited. The defined “omnihost” hostname has to be replaced with the server’s hostname. This file is located at ./netcool/etc/ directory NOT in ./netcool/omnibus/etc directory. The replacable sections are highlighted below:

#
# omni.dat file as prototype for interfaces file
#
# Ident: $Id: omni.dat 1.5 1999/07/13 09:34:20 chris Development $
#
[NCOMS]
{
Primary: omnihost 4100
}
[NCO_GATE]
{
Primary: omnihost 4300
}
[NCO_PA]
{
Primary: omnihost 4200
}
[NCO_PROXY]
{
Primary: omnihost 4400
}

4: Create the interfaces with nco_igen or nco_xgen command. This will generate the interface file in ./netcool/etc using the data provided in omni.dat

-rw-rw-r– 1 root root 3928 Mar 14 10:06 tds.dat
drwxrwxr-x 3 root root 4096 Mar 14 10:07 security
drwxrwxr-x 2 root root 4096 Mar 14 10:08 default
-rw-r–r– 1 root root    0 Mar 14 15:13 interfaces
-rw-rw-r– 1 root root  283 Mar 14 15:21 omni.dat
-rw-r–r– 1 root root  664 Mar 14 15:23 interfaces.linux2x86

5: Create group ncoadmin and add administrative users to that group. Only users belonging to this group can execute process control commands.

6: Define ncoadmin as admin group using  ./nco_pad -admingroup ncoadmin command

8: Define IDUC port. This will fix the IDUC port to any specified port number. If this is not done a random available port will be used. Add the following line to /etc/services

nco_NCOMS 3832/tcp

7: Make Omnibus server PA ware by adding the hostname at ./netcool/omnibus/etc/nco_pa.conf

nco_process ‘MasterObjectServer’
{
Command ‘$OMNIHOME/bin/nco_objserv -name NCOMS -pa NCO_PA’ run as 0
Host            =       ‘yourhostname
Managed         =       True
RestartMsg      =       ‘${NAME} running as ${EUID} has been restored on ${HOST}.’
AlertMsg        =       ‘${NAME} running as ${EUID} has died on ${HOST}.’
RetryCount      =       0
ProcessType     =       PaPA_AWARE
}

8: Start process control in ./netcool/omnibus/bin/

./nco_pad -name NCO_PA

9. Start omnibus server

./netcool/omnibus/bin/nco_pa_start -process MasterObjectServer

10. Check status of Omnibus Server

./netcool/omnibus/bin # ./nco_pa_status
Login Password:
——————————————————————————-
Service Name         Process Name         Hostname   User      Status      PID
——————————————————————————-
Core                 MasterObjectServer   omnihost   root      RUNNING   12830
——————————————————————————-

Configuring Tivoli Common Reporting with DB2 and ITM Warehouse Database on AIX

The ITM Warehouse database has to be added as a Data Source Connection to Tivoli Common Reporting. To be able to do that we have no make sure that the Tivoli Common Reporting server sees the native DB2 libraries.

We had to edit the startTCRserver.sh file to add additional environment variables to achieve this.

We have added the path to the DB2 32 bit libraries since Tivoli Common Reporting expects 32 bit libraries even though you system is 64 bit:

LIBPATH=/opt/IBM/DB2/V9.7/lib32
export LIBPATH

In some cases you might also need to source the DB2 environment variables:

. /home/[db2instance]/sqllib/db2profile

Once these are done log in to the Tivoli Integrated Portal and go to the following:

Go to Reporting -> Common Reporting

Go to Launch drop-down list, and choose the Administration.

Select Configuration tab and Data Source Connections

Then select the New Data Source icon on the upper right corner of the browser window.

Type the name of the datasource and press next. We used tdw21 as datasource name.

Select DB2 from the drop down menu then click next

Fill in the database name and connection string. The database connection string should look the following:

jdbc:db2://[database-server-hostname]:[db2-connection-port]/[db2-database-name]

In our case it is:

jdbc:db2://localhost:50000/WAREHOUS

Then fill in the database connection user id and password on the bottom of the page and press the “test connection” link.

If everything went fine you should see that the connection has succeeded. Save the database settings at the next window and your DB2 database is now setup.

Clean up DJANGO_SESSION table automatically.

Unfortunately Django doesn’t clean up the sessions table so you could end up having hundreds of thousands of entries slowing down the backup and restore procedure tremendously. To fix this issue please follow this guide.

First all we need to create an SQL script that will move data around to keep the current sessions only. I am using the code published on djangosnippets.org.

DROP TABLE IF EXISTS `django_session_cleaned`;
CREATE TABLE `django_session_cleaned` (
`session_key` varchar(40) NOT NULL,
`session_data` longtext NOT NULL,
`expire_date` datetime NOT NULL,
PRIMARY KEY  (`session_key`)
) ENGINE=InnoDB DEFAULT CHARSET=utf8;

INSERT INTO `django_session_cleaned` SELECT * FROM `django_session` WHERE `expire_date` > now();

RENAME TABLE `django_session` TO `django_session_old_master`, `django_session_cleaned` TO `django_session`;

DROP TABLE `django_session_old_master`;

Now we need to automate the cleanup process. We need to run this script from every day at a given time. The command to run this script from the command line is:

mysql -u [username] -p[password-no-space-between-p-and-password]  [database_name] < cleanup.sql

We added this command to the cleanup.sh shell script which is then scheduled to run at 2.00am every day.